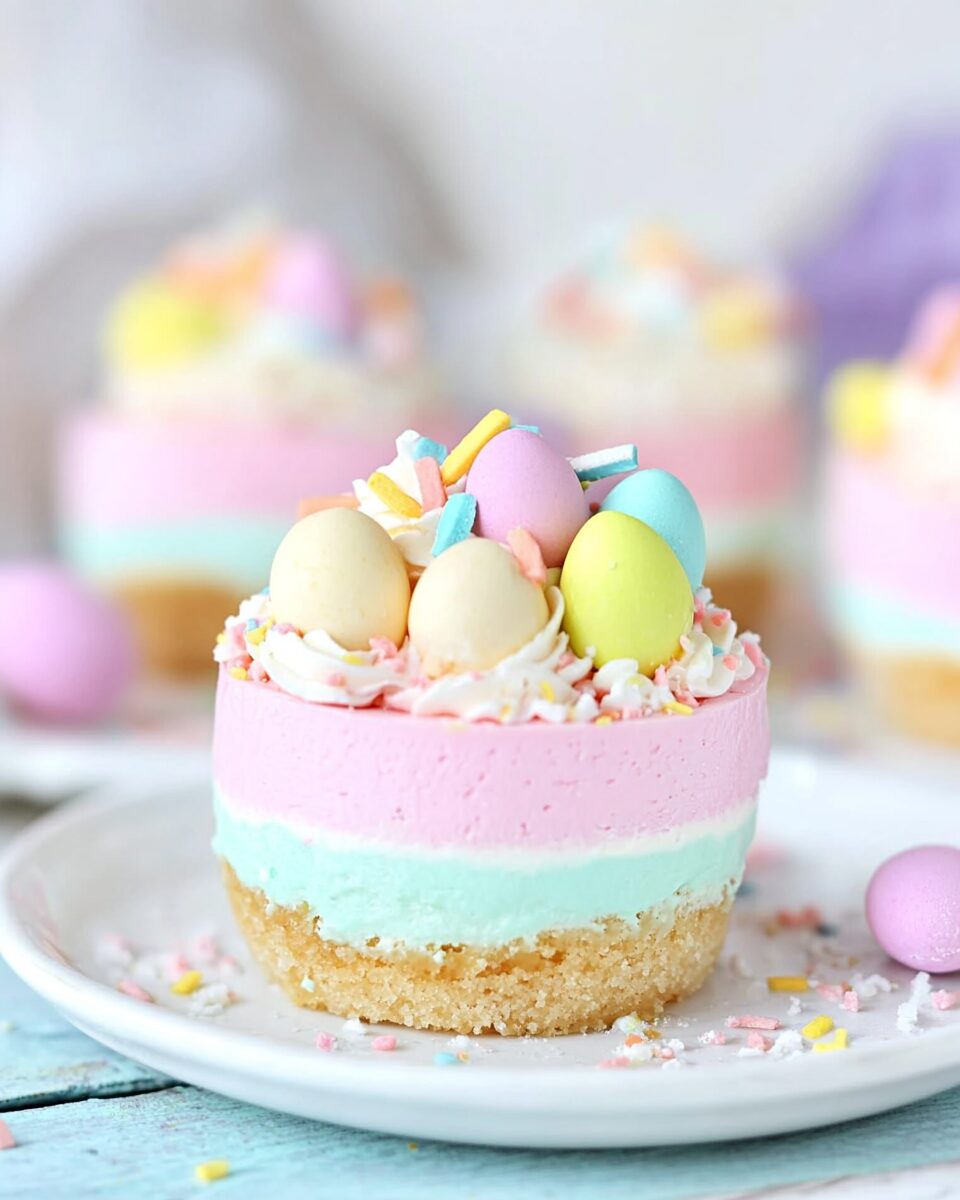
These Easter No-Bake Mini Cheesecakes are a springtime dream come true. With delicate pastel stripes layered in a soft, creamy mousse-like filling, they offer a refreshing twist on traditional cheesecake. Made without an oven, they’re as effortless as they are eye-catching—perfect for Easter gatherings, baby showers, or any spring celebration.
The recipe is foolproof and freezer-friendly, which means you can make them ahead of time and simply thaw and decorate before serving. Topped with a swirl of whipped cream, a sprinkle of pastel decor, and a festive candy egg, these mini cheesecakes are a bite-sized burst of joy on any dessert table.
Full Recipe:
-
6 oz shortbread cookies (approx. 12 cookies)
-
1 tbsp unsalted butter, melted
-
2 tbsp cold water
-
1 packet (2.5 tsp) unflavored powdered gelatin
-
1 lb full-fat cream cheese, at room temperature
-
½ cup (3.5 oz) granulated sugar
-
½ tsp lemon juice
-
1 tsp vanilla bean paste (or vanilla extract)
-
Pinch of salt
-
1 cup heavy cream, at room temperature
-
Assorted gel food coloring (4 colors)
-
½ cup whipped cream (for decorating)
-
Candy eggs and sprinkles (for decorating)
Directions:
-
Crush the shortbread cookies into fine crumbs using a food processor or rolling pin. Mix with melted butter.
-
Press the mixture into 6 cavities of a silicone muffin pan to form the crusts.
-
Hydrate the gelatin by sprinkling it over cold water. Let sit for 5 minutes.
-
In a large bowl, beat room temp cream cheese until smooth. Add sugar, lemon juice, vanilla paste, and salt. Mix well.
-
Gradually add the heavy cream while mixing until completely smooth.
-
Microwave the hydrated gelatin for 10–15 seconds until fully melted and warm (not hot). Stir into the cheesecake mixture.
-
Divide cheesecake into 4 equal portions and tint each with a different gel color.
-
Layer the colors one by one over the crusts in the pan. Smooth each layer before adding the next.
-
Freeze for at least 2 hours or until firm.
-
Unmold and decorate with whipped cream, sprinkles, and candy eggs.
Prep Time: 30 minutes | Freezing Time: 2 hours | Total Time: 2 hours 30 minutes
Kcal: Approx. 330 kcal per serving | Servings: 6 mini cheesecakes
A No-Bake Easter Dessert That Delivers in Flavor and Flair
When Easter rolls around, we often gravitate toward classic springtime desserts like carrot cake, lemon bars, or sugar cookies in the shape of bunnies and eggs. But if you’re ready to surprise your guests with something that’s equal parts stunning and satisfying, look no further than Easter No-Bake Mini Cheesecakes. These adorable pastel-striped cheesecakes are not only visually delightful—they’re also irresistibly creamy, light, and flavorful.
Perfectly portioned for individual servings, these cheesecakes skip the oven altogether, relying instead on the magic of gelatin and chilled cream cheese to achieve their smooth texture. Whether you’re hosting a holiday brunch or contributing to a potluck-style Easter gathering, these mini masterpieces offer an easy and elegant alternative to more traditional fare.
Why These Cheesecakes Are a Standout Choice for Easter
What sets these cheesecakes apart is their visual appeal and simplicity. Their signature pastel stripes, achieved with gel food coloring, make them perfect for spring holidays and other cheerful occasions. Each bite offers the rich, tangy flavor of cream cheese, tempered by a light and mousse-like texture that doesn’t sit too heavy after a meal.
Their appearance alone is enough to get people talking. With their vibrant layers and charming decorations—think whipped cream, sprinkles, and candy eggs—these mini cheesecakes are almost too pretty to eat. Yet once your guests have one bite, they’ll be hooked.
The no-bake factor is also a huge win. During busy holidays when oven space is at a premium, a dessert that requires no baking means less hassle and more flexibility. You can prep these cheesecakes ahead of time, store them in the freezer, and decorate them just before serving.
A Make-Ahead Marvel for Busy Bakers
One of the best things about these Easter cheesecakes is their make-ahead potential. Because they’re stored in the freezer, you can prepare them days or even weeks before your event. This flexibility allows you to focus on other tasks closer to the celebration, like setting the table, preparing savory dishes, or simply enjoying quality time with loved ones.
To ensure the best results, it’s important to wrap the cheesecakes tightly in plastic wrap while they’re in the silicone mold to prevent freezer burn. When you’re ready to serve, all they need is a bit of thawing time in the fridge overnight, followed by decoration.
This make-ahead approach makes these mini cheesecakes especially ideal for busy parents or hosts juggling multiple responsibilities. You can even make them with your kids—who will love choosing colors for the layers and helping decorate the tops.
Perfect for Beginners and Experienced Bakers Alike
Even if you’re not an experienced baker, this dessert is incredibly approachable. There’s no worry about water baths, cracks, or overbaking, which are common stressors with traditional cheesecake recipes. The no-bake method relies on gelatin to stabilize the filling, and with the right technique (especially regarding temperature), it blends smoothly into the cream cheese mixture for flawless results.
And while the idea of layering four separate colors may sound complex, the process is actually quite straightforward. There’s no need to chill between layers, making the workflow much faster than traditional multi-layered desserts. It’s a beginner-friendly process that yields professional-looking results.
Flavor That Balances Richness and Lightness
Taste-wise, these cheesecakes strike the perfect balance. They retain the tangy richness of classic cheesecake, but thanks to the addition of whipped cream, the texture is far lighter—almost mousse-like. This makes them an ideal spring dessert, as they don’t feel overly heavy and pair well with fresh fruit, citrus, or tea.
A touch of lemon juice adds brightness to the base mixture, while vanilla bean paste lends a deep, aromatic sweetness. You can also customize the flavor with other extracts—like almond, orange, or coconut—to better match your Easter menu.
Unlike dense New York-style cheesecakes that can weigh down a dessert plate, these feel airy and refreshing. That makes them perfect for warm-weather occasions or for following a large Easter feast.
A Kid-Friendly and Customizable Creation
Easter is a holiday full of whimsy and color, and this dessert fits right in. Children will adore the pastel hues and candy toppings, and it’s easy to involve them in the process—from mixing food coloring to layering the filling and choosing sprinkles.
Better still, the color scheme is entirely customizable. While soft pinks, purples, blues, and yellows are traditional for Easter, you can adapt this recipe for other holidays or celebrations simply by changing the color palette. Imagine red, white, and blue layers for the Fourth of July, or orange and black for Halloween!
This flexibility also makes them great for themed birthday parties, baby showers, or bridal brunches. The base recipe remains consistent, but the presentation can be reinvented again and again.
Tips for Success and Common Troubleshooting
Although this recipe is fairly foolproof, there are a few pro tips to ensure your cheesecakes turn out just right:
-
Temperature matters: Ensure your cream cheese and heavy cream are at room temperature to avoid lumps in the filling. Likewise, the gelatin should be warm—but not hot—when mixed into the filling to prevent clumping.
-
Work quickly with layers: Once you’ve divided and colored the filling, move fast to layer them in your molds. If the mixture starts to set too soon, it can become difficult to spread smoothly.
-
Use silicone molds: These are essential for easy removal and beautiful presentation. A flexible mold allows you to gently push the cheesecakes out without damaging their shape.
-
Decorate last-minute: Whipped cream and candy decorations should be added just before serving to ensure they look fresh and appealing.
By keeping these tips in mind, you’ll not only simplify the process but also elevate the final presentation of your dessert.
A Delicious Conversation Starter at Any Spring Gathering
Whether you’re hosting an elegant brunch or a casual backyard egg hunt, these cheesecakes are sure to impress. Their vibrant appearance makes them the focal point of any dessert spread, and their individual portions eliminate the need for slicing and serving.
Guests will naturally gravitate toward their fun appearance, but it’s the delicious texture and flavor that will have them asking for seconds. Plus, they store well for several days in the refrigerator, so leftovers (if you’re lucky enough to have any) can be enjoyed well beyond the holiday.
These cheesecakes also make a thoughtful gift. Pack them into small clear treat boxes with a ribbon for a festive edible favor—ideal for teachers, neighbors, or anyone who deserves a sweet springtime surprise.
Conclusion: A New Easter Tradition in the Making
The Easter No-Bake Mini Cheesecakes are more than just a recipe—they’re an experience. They offer the perfect combination of ease, elegance, and irresistible flavor, all wrapped up in a colorful, Instagram-worthy package. With minimal effort and no oven required, you can create a dessert that feels like a bakery-level showpiece, but with homemade heart.
From their light, mousse-like texture to their pastel charm, these cheesecakes are destined to become a beloved part of your spring celebration repertoire. They’re ideal for bakers of all levels, endlessly customizable, and guaranteed to bring smiles to kids and adults alike.
So this Easter, trade in your cupcake liners and cookie cutters for something a little more special—and a lot more fun. You might just start a new holiday tradition that everyone will look forward to year after year.